
Introduction: Why Mold Sticking Deserves Serious Attention
Rubber compression molding is a cornerstone process in the production of durable, precision-engineered rubber parts—from automotive gaskets to industrial seals. At its core, this method relies on heat and pressure to shape rubber compounds within a mold cavity. While the fundamentals seem straightforward, one persistent issue continues to frustrate manufacturers across industries: mold sticking.
Mold sticking refers to the unwanted adhesion of rubber parts to the mold surface during demolding. This problem not only slows down production and increases labor costs but also compromises product integrity—causing surface defects, tearing, and deformation. For high-precision industries like automotive, electronics, and medical devices, even slight imperfections are unacceptable and can result in costly rework or rejection.
I decided to write this comprehensive guide because I’ve encountered this issue many times at Kinsoe, where we specialize in custom molded rubber components for demanding applications. Through our experience, I’ve realized that mold sticking is rarely caused by a single factor—it’s usually a combination of material formulation, mold design, surface condition, and process parameters.
In the following sections, I’ll walk you through the underlying causes of mold sticking and, more importantly, how to prevent it. Whether you’re a process engineer, quality manager, or plant technician, this guide offers practical insights and proven strategies to help you reduce cycle time, improve yield, and ensure smooth demolding every time.
“Sticking isn’t just a minor nuisance—it’s a productivity killer. Fortunately, it’s also preventable.”
Causes of mold sticking problem
Material Factors: What’s in Your Rubber Matters
When it comes to mold sticking, what’s inside your rubber formulation can make or break the process. I’ve seen firsthand how even a minor tweak in the compound recipe can lead to dramatic differences in mold release behavior. Let’s break down the key material-related contributors:
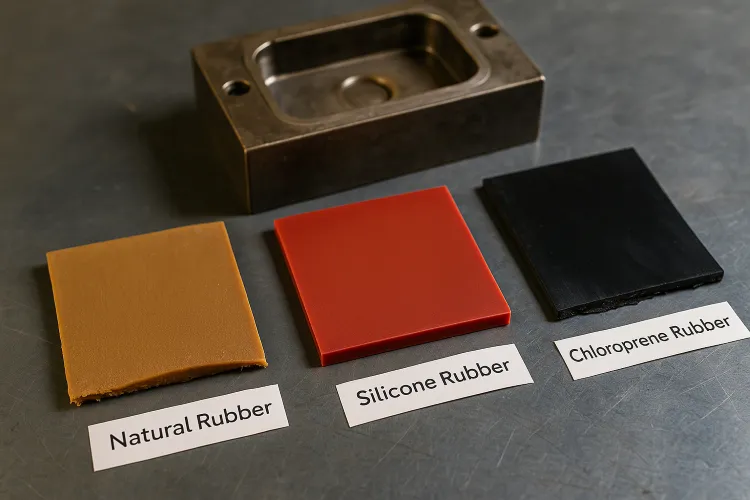
1. Rubber Base Type
Different base rubbers interact differently with mold surfaces. For example:
- Natural Rubber (NR) tends to have higher tackiness, making it more prone to sticking.
- Chloroprene Rubber (CR) offers better mold release due to its inherent oil resistance and polarity.
- Silicone Rubber (VMQ), though stable at high temperatures, can adhere to uncoated metal molds without specialized release strategies.
Insight: Highly polar rubbers generally have lower adhesion to metallic molds than non-polar types like EPDM or NR.
2. Curing System Components
The curing package—sulfur, peroxides, accelerators—directly influences sticking:
- Excess accelerators or improper crosslink density can cause surface tackiness, especially at mold parting lines.
- Sulfur bloom from over-saturated curing systems can create sticky residues on mold surfaces.
Selecting the right curing system and optimizing its dosage is critical to reduce chemical-related sticking.
3. Plasticizers and Process Oils
Small-molecule additives like plasticizers and softeners improve flowability but often migrate during vulcanization. This migration can:
- Form a greasy film on the mold surface
- React with mold coatings and degrade their anti-stick properties
I once dealt with a case where high-aromatic process oil caused consistent mold fouling every 10 cycles—until we reformulated with a lower volatility plasticizer.
4. Filler Type and Dispersion
Fillers such as carbon black, silica, or clay enhance mechanical properties, but poor dispersion can increase surface roughness and localized tack:
- High-surface-area fillers tend to increase surface energy, which can amplify adhesion to the mold.
- Inadequate dispersion leaves uneven surfaces that grip to microstructures in the mold.
5. Lack of Internal Lubricants
If the formulation lacks waxes, stearates, or processing aids, the rubber compound may stick purely from physical adhesion. These internal lubricants form a microscopic barrier layer during curing, enabling cleaner release.
Key Takeaway: A sticky compound isn’t always about the mold—it often starts in the formulation.
Mold Factors: The Surface Behind the Problem
Even with a well-optimized rubber compound, mold sticking can still persist. In my experience, the design and surface condition of the mold itself are just as critical. Let’s explore the mold-related elements that influence demolding performance:
1. Mold Material Selection
The base material of the mold significantly affects rubber adhesion:
- Tool Steel (P20, H13): Durable and commonly used, but can develop micro-pitting over time that traps rubber.
- Aluminum: Excellent for prototyping but prone to wear and oxidation, which increases sticking over cycles.
- Stainless Steel: Offers superior corrosion resistance and smoother surfaces, but may still require coating for optimal release.
Each material has unique surface energy characteristics that determine how easily rubber will separate post-cure.
2. Surface Roughness and Microstructure
Surface finish is a hidden but powerful variable:
- Highly polished molds (Ra ≤ 0.1 μm) reduce mechanical interlocking, enabling cleaner part release.
- Textured or worn surfaces increase the likelihood of mechanical adhesion, where rubber physically grips onto microscopic crevices.
A common mistake I’ve seen is overlooking polishing during mold maintenance—tiny scratches quickly turn into major sticking points.
Quote: “Your mold’s surface is like a fingerprint—any flaw will leave an impression on the rubber.”
3. Coating Performance and Wear
Many molds are treated with anti-stick coatings to improve release. Common coatings include:
- Titanium Nitride (TiN): Hard and wear-resistant, often used for high-volume production.
- PTFE or Fluoropolymer Coatings: Excellent low-friction properties but sensitive to abrasion.
- Nickel-Phosphorus (Electroless Plating): Good surface uniformity with moderate release characteristics.
However, these coatings degrade over time. I’ve worked with clients who were puzzled by sudden mold sticking—only to discover their mold coatings had worn out after 20,000 cycles.
4. Mold Design and Geometry
Good mold design isn’t just about filling and curing—it also affects demolding:
- Sharp corners and undercuts can trap rubber, increasing adhesion and causing tearing.
- Insufficient draft angles make ejection more difficult, especially with soft compounds.
- Poor venting design leads to trapped gases, which carbonize on the mold surface and form sticky residues.
One practical improvement we often suggest at Kinsoe is to increase the draft angle to at least 3°–5° on vertical walls, especially for large or thick-walled parts.
Process Parameters: Fine-Tuning for Clean Release
While formulation and mold design lay the groundwork, the way you run your compression molding process ultimately determines the outcome. I’ve seen production lines suffer from persistent sticking issues simply due to one overlooked setting—temperature too high, pressure too long, or cooling too fast.
Here are the key process parameters that influence mold sticking:
1. Curing Temperature, Pressure, and Time
These three form the heart of vulcanization, and mismanagement of any can lead to problems:
- Excessive temperature or over-curing can create surface blooming, hardening, or scorching—each increasing the likelihood of sticking.
- Insufficient curing results in tacky surfaces that bond to the mold.
- High pressure may force rubber into mold microstructures, especially if surface finish is rough, leading to mechanical interlocking.
For example, in one troubleshooting case, simply reducing the curing temperature by 5°C and increasing the dwell time by 15 seconds resolved a persistent sticking issue.
Key Insight: Optimal vulcanization isn’t just about crosslinking—it’s also about surface finish quality post-cure.
2. Cooling Rate and Demolding Temperature
Rapid cooling might seem efficient, but it creates a mismatch in shrinkage between the rubber part and the mold cavity:
- If the rubber shrinks too quickly, internal stress builds up, causing the part to grip the mold more tightly.
- Demolding at too high a temperature increases surface tackiness.
It’s crucial to allow the part to cool down to a controlled release temperature—typically 60–90°C depending on the compound.
3. Injection or Transfer Pressure Deformation
In transfer or injection molding, excessive injection pressure can:
- Slightly deform the mold cavity or its parting line
- Cause rubber to flash or seep into unintended areas
- Make extraction more difficult, especially for low-hardness rubbers
We’ve found that gradually reducing injection pressure during the final fill stage can ease part removal without compromising cavity fill.
4. Venting and Gas Management
Trapped gases during vulcanization don’t just cause porosity—they also burn or carbonize on the mold surface, forming sticky residue over time:
- Ensure proper vent channels are included in the mold design
- Use vacuum-assisted molding or controlled bleeding vents for high-viscosity compounds
Practical Tip: Regular mold cleaning with a non-abrasive solvent helps prevent build-up of these residues and maintains release efficiency.
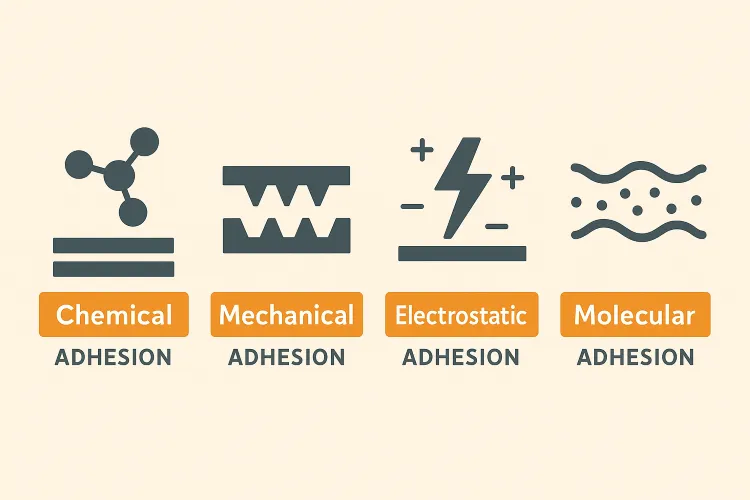
Adhesion Type Analysis: Understanding the Root Mechanism
Not all mold sticking is created equal. Over the years, I’ve learned that to effectively solve sticking problems, I first need to identify how the rubber is adhering to the mold. Each adhesion type has distinct causes—and therefore, different preventive strategies.
1. Chemical Adhesion
This is the most aggressive form of sticking and occurs when rubber components react chemically with the mold surface:
- Peroxides, sulfur, or additives in the formulation may form chemical bonds with the metal mold.
- Elevated temperatures and prolonged cure times accelerate these reactions.
This type of adhesion is often irreversible and requires mold resurfacing or coating renewal to resolve.
Example: A peroxide-cured silicone rubber stuck severely to an uncoated stainless steel mold because of surface oxidation triggering unwanted bonding.
2. Mechanical Adhesion
This occurs when rubber physically locks into micro-scale surface roughness or damage on the mold:
- Polished or worn molds with tiny pits or scratches trap rubber as it expands during curing.
- Flash or overflows may creep into sharp edges or undercuts.
This is common when tooling hasn’t been properly polished or maintained.
Quote: “If your mold is wearing down microscopically, your parts will start sticking macroscopically.”
3. Electrostatic Adhesion
Friction during demolding can generate static charges, especially with dry rubber compounds:
- This static holds thin parts or flash onto the mold, creating inconsistent release.
- It’s more prevalent in dry, low-humidity production environments.
Antistatic coatings or grounding systems can help neutralize this problem.
4. Intermolecular (van der Waals) Adhesion
Even without chemical reactions, weak molecular forces between the rubber surface and mold can cause mild sticking:
- Occurs with very smooth molds or very tacky rubber formulations
- May not always be visible but leads to drag marks or resistance during demolding
This is particularly noticeable with silicone or low-hardness compounds.
5. Contamination-Induced Adhesion
A common but often overlooked cause of sticking is surface contamination:
- Migrating additives (like plasticizers or waxes) can build up on the mold over time
- Residues from poorly cleaned mold release agents can form a sticky barrier
Key Takeaway: Many chronic mold sticking issues are due to cumulative contamination—what you don’t clean today, sticks tomorrow.
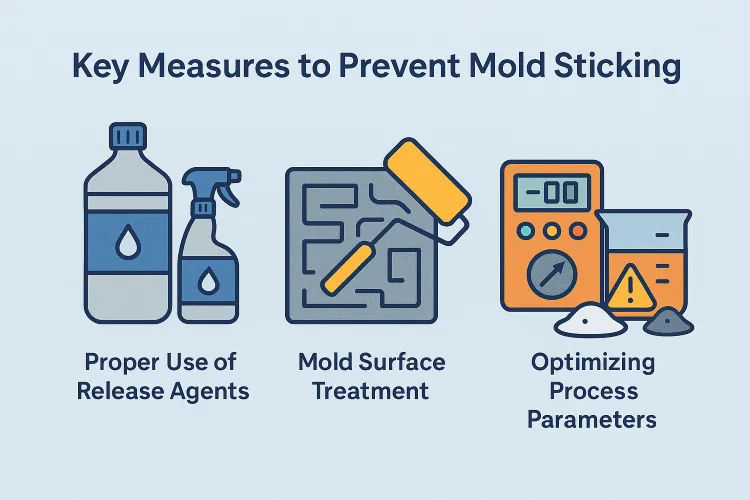
Key measures to prevent mold sticking

Choosing and Using Mold Release Agents Wisely
When I work with engineers facing persistent mold sticking, the first thing I check—after confirming the formulation and mold condition—is their use of mold release agents. Surprisingly, this basic tool is often either misused or misunderstood. Done right, release agents can dramatically improve demolding efficiency; done wrong, they can introduce new problems or even make sticking worse.
1. Types of Mold Release Agents
There is no one-size-fits-all when it comes to release chemistry. Different molding conditions and rubber formulations call for different types:
- Water-based release agents: Environmentally friendly and safer for operators, suitable for many EPDM and NR applications. But they may require frequent reapplication and careful drying to prevent steam pockets.
- Solvent-based release agents: Provide fast, uniform film formation and excellent release performance, especially in high-temperature molding. However, they pose fire and VOC risks.
- Semi-permanent release agents: Bond to the mold surface to form a durable layer that lasts multiple cycles. Ideal for high-volume production, reducing downtime caused by frequent spraying.
- Paste or wax-based agents: Used in complex or high-drag molds, offering enhanced anti-stick properties but often require hand application and polishing.
Pro Tip: Always match the release agent type to both your compound and production cycle time—an overly aggressive agent may contaminate the rubber, while a weak one may not last a full cycle.
2. Correct Application Techniques
How you apply the release agent is just as important as what you use:
- Uniformity is key—Uneven application leads to inconsistent release and potential surface defects.
- Allow proper drying time, especially for water-based types. Spraying directly before closing the mold can cause blistering or steam marks.
- Avoid buildup—Overuse of release agents can cause residue buildup, especially on vents and parting lines, which ironically leads to more sticking.
At Kinsoe, we recommend using fine mist sprayers or automated systems to ensure consistent coverage—especially for multi-cavity or large-area molds.
3. Don’t Overdo It
More isn’t always better. One common mistake I’ve seen is excessive reapplication between every cycle “just in case.” This habit leads to:
- Transfer of silicone or waxy residues onto the rubber surface
- Reduced adhesion for secondary operations like painting or bonding
- Increased mold fouling over time
Key Insight: A well-chosen, properly applied release agent should allow 10–30 cycles between reapplications in optimized conditions.
Mold Surface Treatment and Maintenance
Even the best rubber formulation and release agent won’t solve sticking problems if the mold itself is neglected. In my experience, many recurring demolding issues stem from surface wear, residue buildup, or lack of preventive coating strategies. This chapter focuses on what you can do to turn your mold into a release-friendly surface—cycle after cycle.
1. Regular Cleaning and Polishing
A dirty mold is a sticky mold.
- Carbonized rubber residues, plasticizer buildup, and degraded release agent films can accumulate quickly—especially in high-temperature operations.
- Use non-abrasive solvents (like isopropyl alcohol or mold cleaner sprays) for routine cleaning, and schedule deep cleaning with mechanical polishing every few thousand cycles.
- For textured or vented molds, compressed air and ultrasonic cleaning can dislodge hidden contaminants.
Tip: At Kinsoe, we perform visual inspections and quick surface wipe-downs after every 200–300 cycles to maintain optimal surface conditions.
2. Apply Advanced Anti-Stick Coatings
Modern surface coatings can significantly enhance mold release and durability. Some effective options include:
| Coating Type | Benefits | Use Case |
|---|---|---|
| Nedox (nickel-phosphorus) | Anti-corrosive, wear-resistant, non-stick surface | Ideal for EPDM, NR, and abrasive compounds |
| PTFE (Teflon) | Very low surface energy, excellent release | Best for silicone molding |
| Titanium Nitride (TiN) | Hard, wear-resistant coating | High-cycle steel molds |
| Nanoplas™ or similar | Thin-film nano coatings for ultra-smooth surfaces | Precision molds or soft elastomers |
These coatings reduce both chemical and mechanical adhesion, and their ROI is clear in reduced cleaning time, longer mold life, and higher yield rates.
3. Inspect and Repair Surface Damage
Mold wear is inevitable—but if not addressed, small defects will cause big problems:
- Micro-pits and scratches from abrasive fillers or ejector pins can anchor rubber compounds
- Worn vent lines may trap material and compromise ejection
Implement a maintenance log to track mold usage, cleaning frequency, and any observable defects. Preventive polishing or localized re-plating often costs less than fixing a rejected batch of molded parts.
4. Storage and Handling
Protecting your mold when it’s not in use is just as critical:
- Store in dry, temperature-controlled environments to prevent oxidation and corrosion.
- Apply a rust inhibitor or mold preservative during storage, and clean it off thoroughly before use.
Golden Rule: Treat your mold like a toolmaker’s watch—it should always be clean, coated, and ready to perform.
Optimizing Process Parameters
In rubber compression molding, process parameters are the “hidden levers” behind part quality and ease of demolding. I’ve worked with manufacturers who solved years of sticking problems—not by changing rubber or tools—but by fine-tuning their heat, pressure, and venting protocols.
Here are the key areas to focus on:
1. Control Vulcanization Temperature and Time
Too high or too long can burn the compound. Too low or too short can undercure it.
- Overcuring increases surface hardness and stickiness due to excessive crosslinking or blooming.
- Undercuring leaves tacky rubber that bonds to mold surfaces and causes tearing during ejection.
Benchmark: Start with the compound supplier’s recommended cure curve, then conduct test runs at ±5°C and ±15 seconds to find the sweet spot.
In our facility at Kinsoe, we log temperature deviations per batch and correlate them with mold release performance—this helps catch drift before it becomes a problem.
2. Adjust Injection or Transfer Pressure and Hold Time
For transfer or injection molding:
- Excessive injection pressure can deform thin mold sections or force rubber into vent gaps, causing sticking or flash.
- Overly long hold times may cause rubber over-compression and poor demolding.
Instead, use multi-stage pressure profiles where the pressure is reduced slightly before curing ends—this minimizes mold deformation and reduces physical lock-in.
3. Fine-Tune Cooling Rate and Demold Timing
Cooling should be fast enough to maintain cycle efficiency, but not so rapid that it creates internal stresses:
- Quick cooling contracts rubber too fast, increasing grip on the mold.
- Too-warm demolding (above 90°C for many rubbers) can lead to surface tack.
The right strategy? Use controlled cooling with water channels or thermal oil circuits, and allow parts to demold closer to the rubber’s glass transition point for a cleaner break.
4. Improve Mold Venting Strategy
Air entrapment is a silent killer. It:
- Leads to surface blemishes and burn marks
- Carbonizes into sticky residue on the mold
- Builds pressure that delays full cavity fill and causes poor release
Solutions include:
- Adding vent slots at critical flow points (0.01–0.03 mm deep)
- Vacuum-assisted molding for high-viscosity or closed designs
- Regular vent cleaning, especially if you’re using carbon black or silica-filled compounds
Key Learning: Better venting often improves both part quality and demolding, with no impact on cycle time.
Rubber Formulation Optimization
When dealing with persistent mold sticking issues, one of the first things I revisit is the compound formulation. Many sticking problems originate from within the rubber itself—from how it’s engineered to how its additives behave during vulcanization.
Here are several key formulation aspects to examine and adjust:
1. Reduce or Replace Migrating Additives
Additives such as plasticizers, softeners, and tackifiers may migrate to the surface during molding, leaving behind a sticky film that fouls the mold.
- Choose high-molecular-weight plasticizers or low-volatility process oils to reduce migration.
- Use internal lubricants like zinc stearate, stearic acid, or silicone waxes that promote internal slip without excessive surface residue.
Real-World Fix: One EPDM blend we optimized at Kinsoe replaced an aromatic oil with a synthetic ester—reducing mold fouling and extending cleaning intervals from 500 to 1,800 cycles.
2. Match Rubber Type to Mold Material
Not all rubbers pair equally with all mold surfaces. For example:
- Silicone rubbers often stick to polished steel unless coated with fluoropolymer.
- Fluoroelastomers tend to release better but require tightly controlled temperature and pressure profiles.
If you’re experiencing chronic sticking with one material, it may be more effective to switch to a formulation with better mold compatibility than to fight with coatings and agents.
3. Use Functional Fillers and Dispersants
Fillers can make or break your mold release performance:
- Choose low-structure carbon blacks or treated silicas that reduce compound tack.
- Ensure uniform dispersion using proper mixing temperatures and durations—unmixed lumps will increase surface tackiness.
- Consider release-promoting fillers like talc or mica as part of the filler system.
4. Incorporate Mold Release Additives
Some internal additives act as sacrificial agents that migrate slightly during cure to form a parting layer:
- Specialty waxes or siloxane-based additives can reduce the need for external mold release agents.
- Use with caution—overuse may affect post-processing steps like bonding or painting.
Caution: Internal release agents can interfere with bonding adhesives or coatings—always test compatibility with downstream processes.
5. Balance Crosslink Density
High crosslink density can lead to:
- A stiffer surface that doesn’t flex during demolding
- Excess surface energy, which increases adhesion
Optimizing the accelerator-to-sulfur ratio or peroxide dosage can help find the right balance between performance and processability.
Case analysis and practical experience
Success Stories: What Really Works on the Factory Floor
While theory is essential, there’s nothing more convincing than seeing these solutions work in the real world. At Kinsoe and among our partners, we’ve implemented dozens of mold release optimizations—and the best results often come from small, strategic improvements.
Case 1: Reducing Sticking with Optimized Mold Release Usage
A medical-grade silicone part manufacturer was dealing with high reject rates due to surface tears during demolding. Their initial response was to increase the frequency and thickness of mold release spray. Ironically, this worsened the problem, leaving residues that compounded sticking.
Solution:
We helped them switch from a solvent-based spray to a semi-permanent fluoropolymer release agent, combined with a disciplined application schedule every 30 cycles.
Result:
- Reject rate dropped from 8% to 1.5%
- Reduced mold cleaning frequency by 50%
- Surface finish quality improved and met FDA standards
“Using less release agent—when used properly—was far more effective than overusing the wrong one.”
Case 2: Mold Coating Extension Saves Weeks of Downtime
An automotive gasket producer complained of daily mold cleaning due to compound buildup in mold corners. Their EPDM compound was interacting with micro-porous steel surfaces.
Solution:
We proposed applying a Nickel-Phosphorus (Nedox) coating with a satin finish, optimized for thermal shock and abrasion resistance.
Result:
- 4x increase in uninterrupted production cycles
- Reduced cleaning labor by over 70%
- Annual mold maintenance costs dropped by nearly $12,000
The client referred to it as “the cheapest upgrade with the biggest return.”
Case 3: Demystifying a Formula-Based Sticking Issue
A compounder supplying custom rubber sheets reported random sticking incidents across different mold cavities, despite consistent temperatures and pressures.
Root Cause:
Upon investigation, the issue traced back to batch-to-batch variability in the filler dispersion—particularly clumping of silica and lack of dispersing agent.
Solution:
We rebalanced the filler system and introduced a silane-treated silica with optimized mixing protocols.
Result:
- 100% cavity yield stability restored
- Surface quality uniform across all cavities
- No mold sticking observed across 1,000+ cycles
Common Pitfalls and Solutions
Even experienced molders can fall into common traps that worsen mold sticking. The good news is that most of these issues are preventable once you know what to look for. Here are three of the most frequent problems—and how I’ve helped clients resolve them.
Pitfall 1: Using the Wrong Mold Release Agent
Symptom: Sticky parts, residue on the mold, inconsistent release across cavities.
Root Cause: Mismatch between the compound and the mold release chemistry.
- For example, silicone rubber often requires fluoropolymer-based agents, while EPDM works better with water-based formulas.
- Over-application can leave films that bake onto the mold, leading to fouling and even contaminating future parts.
Solution:
- Perform compatibility tests with 2–3 agent types under production temperatures.
- Set up a controlled application protocol (e.g., every 20–30 cycles, with a precise misting pattern).
Tip: Treat mold release like a critical raw material—not an afterthought.
Pitfall 2: Mold Design Neglect
Symptom: Rubber sticks at parting lines, edges, or undercuts.
Root Cause: Poor draft angles, sharp corners, or inadequate venting.
- Without at least a 2°–5° draft, even slightly tacky rubber won’t eject cleanly.
- Flash traps and unvented zones can accumulate material, harden, and act like micro-anchors.
Solution:
- Review CAD models to optimize cavity geometry for demolding.
- Add micro-vents or revise ejector pin positions to distribute demolding forces evenly.
A few millimeters in mold design can save hundreds of hours in cleaning and rework.
Pitfall 3: Process Settings Left on Autopilot
Symptom: Occasional sticking in the same mold despite no obvious surface issues.
Root Cause: Cure settings not adjusted for compound batch variability or environmental changes.
- Temperature fluctuations or humidity changes can alter cure rates and affect surface finish.
- Leaving settings unchanged batch after batch leads to cumulative error—especially in multi-cavity tools.
Solution:
- Implement process monitoring and periodic recalibration.
- Use temperature sensors and cure time validation every 1–2 weeks for high-output lines.
Lesson Learned: Mold sticking is dynamic—your settings should be, too.
Summary and Final Recommendations
Throughout this guide, I’ve walked you through the many faces of mold sticking in rubber compression molding—from molecular-level causes to actionable shop floor strategies. Here’s what I’ve learned after years of helping manufacturers troubleshoot this deceptively complex issue:
1. Mold Sticking Is a Multi-Factor Problem
There’s no silver bullet. Sticking can result from:
- Migrating plasticizers in your rubber
- Micro-pitting on your mold surface
- Overcure due to poor heat control
- Simply forgetting to reapply a release agent
That’s why holistic diagnosis—considering materials, mold, and process in parallel—is key.
2. Prevention Must Be Proactive
Don’t wait until your parts start tearing or your mold fouls up.
- Formulation phase: Choose low-migration additives and incorporate internal lubricants
- Mold design phase: Add draft angles, optimize venting, and select proper coatings
- Production phase: Tune cure time, temperature, pressure, and cooling profiles continuously
Golden Rule: If you’re fixing sticking during production, you’re already behind.
3. Process Optimization Is Ongoing
Mold sticking isn’t static—it evolves with:
- Aging molds
- Changing ambient conditions
- Supplier-to-supplier compound variability
Develop a culture of routine process audits, mold inspections, and formulation reviews to stay ahead of the problem.
Final Action Guide
To prevent mold sticking effectively:
- ✅ Audit your current release agents and mold maintenance cycles
- ✅ Review your mold geometry for undercuts, vents, and draft angles
- ✅ Re-evaluate your compound for migration-prone ingredients
- ✅ Log process parameters and track anomalies over time
- ✅ Train your operators on best practices for cleaning, spraying, and demolding
“Solving mold sticking isn’t about luck—it’s about knowing where to look, and choosing the right lever to pull.”
If you’re dealing with persistent release issues or designing a new rubber molding line, I’d be glad to share more insights. Feel free to connect through Kinsoe or reach me directly at contact@kinsoe.com
Riferimenti: