
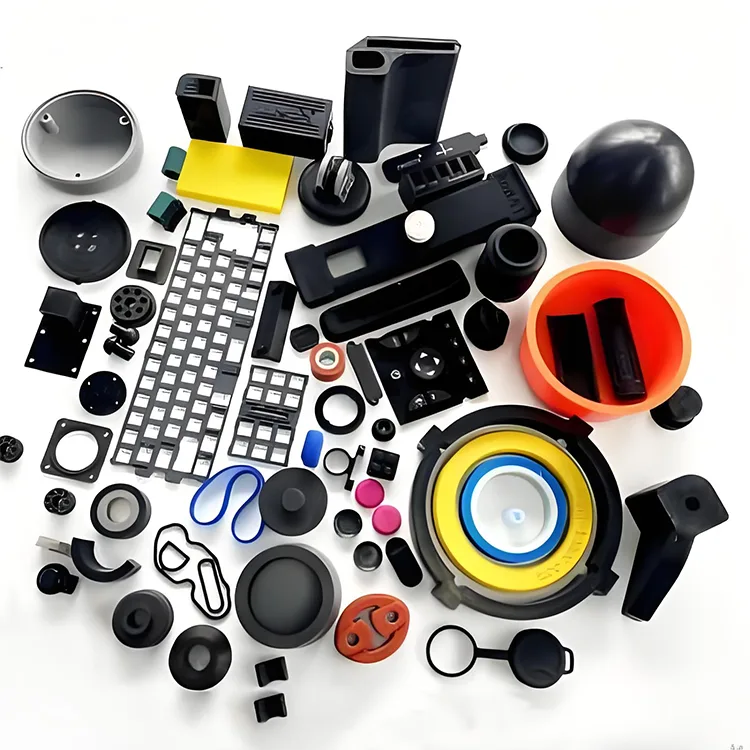
Introduction
At Kinsoe Rubber, we’ve worked with clients across industries—from automotive to construction—who rely on rubber components to perform flawlessly in demanding conditions. However, achieving that level of reliability isn’t always straightforward. Rubber products are vulnerable to a wide range of defects during the manufacturing process. Some defects might affect only the product’s appearance, but many can compromise its mechanical properties, chemical resistance, or long-term durability.
Over the years, I’ve seen how even small issues—like bubbles, sticking, or hardness variations—can lead to product failures, costly recalls, or poor customer experience. That’s why understanding common rubber defects and their root causes is critical not just for manufacturers, but also for engineers and buyers who need consistent quality.
In this article, I’ll walk you through the most common defects we encounter in rubber product manufacturing, explain why they occur, and—more importantly—share proven, field-tested solutions we apply at Kinsoe to prevent them. Whether you’re working with molded rubber gaskets, extruded seals, or precision parts, these insights will help you avoid costly setbacks and improve overall product performance.
1. Bubbles and Voids
Bubbles, air pockets, or voids are among the most frequently encountered issues in rubber products—especially molded parts. They don’t just affect aesthetics; they can weaken the structure of the material and lead to leakage or early failure, especially in sealing applications.
What Causes It
In our experience at Kinsoe, bubbles typically form due to one or more of the following reasons:
- Trapped air during mixing – If the raw rubber and additives aren’t properly degassed during mixing, air can remain in the compound and expand during curing.
- Poor mold venting – When the mold lacks sufficient vent paths, air cannot escape when the rubber fills the cavity.
- Moisture in raw materials – Some rubber materials, especially polyurethane or certain additives, are sensitive to moisture. Water turns to vapor during vulcanization and forms gas pockets.
- Overly fast injection speed – In injection molding, a rapid injection may trap air in corners and narrow cavities.
Our Proven Solutions
Here’s how we tackle and prevent bubble formation at Kinsoe:
- Optimize the Mixing Process
We ensure that the mixing process includes a vacuum step or open-mill degassing to release trapped air. For high-viscosity compounds, we slow down the mixing process to avoid turbulence. - Pre-Dry Moisture-Sensitive Materials
Any compound containing hygroscopic materials is pre-dried in an oven at controlled temperatures to remove absorbed moisture. We typically dry for 2–4 hours depending on the compound and filler load. - Improve Mold Venting Design
We collaborate closely with mold makers to ensure every cavity includes adequate vent grooves—usually 0.02–0.05 mm deep—placed strategically at the farthest points from the injection gate. These help air escape easily as the rubber flows in. - Adjust Injection Speed and Pressure
In injection molding, we set the initial injection stage to a moderate speed to avoid turbulence, then switch to higher pressure only after the cavity is partially filled. This two-stage approach reduces air entrapment. - Vacuum Molding When Necessary
For critical sealing parts, we use vacuum compression molding. This process removes almost all air from the mold cavity before curing begins, ensuring a bubble-free product.
By implementing these controls, we’ve seen a dramatic reduction in bubble-related quality issues, even in complex geometries or thick parts. If you’re dealing with similar problems, I highly recommend starting with your mixing and mold design.
2. Uneven Hardness
Hardness is a critical performance factor for rubber products, especially when they’re used for sealing, cushioning, or vibration damping. At Kinsoe, we’ve found that inconsistent hardness across a product can lead to functional issues like uneven compression, premature wear, or inconsistent sealing under pressure.
What Causes It
Hardness variation typically results from a combination of process and material issues. The most common causes we’ve diagnosed include:
- Non-uniform mixing – If curatives or fillers are not evenly distributed during compounding, some areas may cure faster or harder than others.
- Uneven mold temperature – Molds with hot and cold spots cause sections of the part to vulcanize differently.
- Inaccurate or uneven curing time – Overcuring some regions while undercuring others leads to hardness inconsistency.
- Varying cross-section thickness – Thicker areas take longer to cure fully and can remain softer inside.
Our Proven Solutions
Here’s how we ensure consistent hardness across the entire product:
- Enforce Strict Mixing Protocols
We use high-precision internal mixers or two-roll mills and follow a multi-stage mixing process. The curatives are always added at the final stage to prevent premature crosslinking and to ensure homogenous distribution. - Calibrate and Maintain Molds
Our mold systems are equipped with multiple embedded heating elements and sensors. We perform regular thermal mapping to detect and correct any temperature gradients. - Control Curing Time by Cross-Section
We calculate the ideal vulcanization time based on the thickest section of the part. For example, a 5 mm thick section requires longer curing than a 2 mm section—so we always base our curing cycle on the slowest-to-cure area. - Use Conductive Fillers for Better Heat Transfer
For parts with variable thickness, we sometimes modify the formulation by adding heat-conductive fillers like aluminum silicate or carbon black to ensure even heat transfer and curing. - Post-Cure If Necessary
In some cases, especially with silicone or fluoroelastomers, we use a post-curing oven stage to “equalize” hardness across all regions and drive out volatiles that may affect physical properties.
By combining precise temperature control, proper compound dispersion, and cycle optimization, we consistently produce rubber products with hardness deviations within ±3 Shore A—well below most industry tolerances.
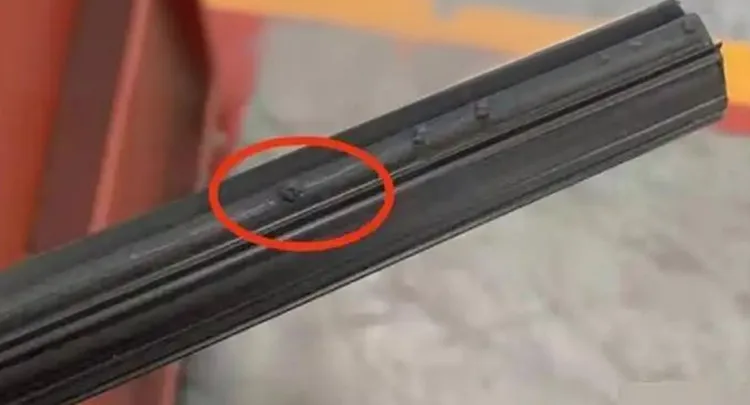
3. Surface Defects (Cracks, Wrinkles, Flow Marks)
The surface of a rubber product isn’t just about looks—it reflects the integrity of the molding process. Cracks, wrinkles, flow lines, or other visual imperfections can indicate deeper issues like poor fill, uneven cure, or contamination. And in applications like sealing or aesthetics-sensitive products, surface defects are unacceptable.
What Causes It
At Kinsoe, we’ve traced most surface defects to the following causes:
- Dirty or damaged molds – Residue buildup, corrosion, or scratches on the mold surface can imprint directly onto the rubber.
- Incorrect mold release usage – Over-application or poor-quality release agents can leave residue or cause flow disruption.
- Inadequate material flow – If the compound doesn’t flow smoothly into the mold, it can fold, wrinkle, or fail to fill details.
- Premature cure during injection – If the rubber begins to cure before the mold is fully filled, it can create surface tension lines or marks.
- Contaminated raw materials – Dust, metal shavings, or foreign particles trapped during processing can create pimples or inclusions.
Our Proven Solutions
Here’s how we minimize or eliminate surface defects in our production:
- Implement Strict Mold Cleaning Routines
We inspect molds before each production cycle and clean them using ultrasonic equipment or safe solvents. Any rust or buildup is polished out, and worn molds are refurbished or replaced. - Use Professional-Grade Mold Release Agents
We select release agents tailored to the compound type (e.g., silicone-based for EPDM or water-based for NBR). Application is kept thin and even—too much release agent is just as problematic as too little. - Improve Compound Flowability
We may reduce the filler load, adjust oil content, or switch to a lower-viscosity rubber grade. Better flow ensures the material conforms to the mold without leaving wrinkles or hesitation lines. - Optimize Injection or Compression Speed
For compression molding, we preheat the compound slightly to reduce viscosity before loading. For injection molding, we fine-tune the fill rate to avoid premature curing or “freezing” before the cavity is filled. - Filter Compounds Before Molding
We use fine mesh screens in our extruders and kneaders to remove physical contaminants. This ensures a clean finish and eliminates particle-related surface imperfections.
Surface finish often reveals what’s going wrong inside the process. By prioritizing mold maintenance, formulation balance, and precise control of the molding cycle, we achieve not just clean surfaces—but reliable, defect-free performance.
4. Dimensional Deviation
Dimensional accuracy is vital in applications like gaskets, seals, sleeves, and any parts designed to fit within a tight tolerance range. At Kinsoe, we’ve helped numerous clients resolve issues where rubber components were too big, too small, warped, or simply inconsistent—leading to poor sealing, misfits, or even system failures.
What Causes It
Rubber, being an elastic material, is inherently prone to dimensional changes. The most common causes we’ve identified include:
- Imprecise mold design or wear – If the mold cavity is out of spec, worn down, or poorly machined, every part will be affected.
- Inconsistent material shrinkage – Different compounds shrink differently after vulcanization and cooling, and improper formula design can exaggerate this.
- Poor pressure or time control during molding – Inadequate pressure can result in incomplete fills; overpressure or uneven loading can cause expansion or flash.
- Environmental conditions during cooling – Rubber parts removed too early or cooled too quickly can warp or shrink unpredictably.
Our Proven Solutions
Here’s how we control dimensions with high precision:
- Invest in High-Precision Mold Tooling
At Kinsoe, all our molds are CNC-machined to tight tolerances—usually within ±0.02 mm—and regularly calibrated. For long runs, we check for wear and recondition molds before tolerance drift becomes an issue. - Use Compound-Specific Shrinkage Compensation
Every rubber compound has a unique shrinkage rate (typically 1–3%). We factor this into mold design and validate it during the prototyping phase. For critical parts, we conduct shrinkage trials to refine tooling specs. - Control Vulcanization Pressure and Time
We monitor pressure throughout the molding cycle using in-mold sensors when needed. The curing cycle is carefully matched to part geometry and compound behavior—ensuring a full fill without overcompression. - Avoid Rapid Cooling or Premature Demolding
To prevent warpage or dimensional bounce-back, we allow parts to cool in the mold under pressure. For heat-sensitive parts, we use gradual post-mold cooling on flat trays or racks to prevent distortion. - Apply Post-Cure Sizing When Needed
For ultra-precise seals or profiles, we sometimes use post-cure sizing—placing the part in a precision fixture during final heat treatment to “lock in” its final shape.
With these practices, we routinely achieve dimension control within ±0.5% of the design spec, even on complex parts. If you’re dealing with tolerance issues in rubber parts, start by reviewing your mold accuracy and material shrinkage assumptions—it’s often where the root cause lies.
5. Flash (Excess Material at Edges)
Flash refers to the thin, unwanted layer of rubber that seeps out at the mold parting lines or venting points. While flash may seem like a cosmetic issue, it can cause serious problems—especially in sealing products where a clean edge is crucial. At Kinsoe, we’ve helped many customers solve flash issues that were leading to part rejection, assembly difficulty, or poor performance.
What Causes It
Flash usually occurs due to one or more of the following:
- Worn-out or poorly fitted molds – Gaps at the parting line allow rubber to escape during compression or injection.
- Excess injection or compression pressure – High pressure forces material into even the smallest gaps.
- Improper clamping force – Uneven or insufficient clamping during molding results in parting line separation.
- Too much material loaded into the mold – Overfilling leads to squeeze-out beyond the intended cavity.
Our Proven Solutions
Here’s how we eliminate flash effectively:
- Maintain Mold Parting Lines and Cavities
We inspect mold parting surfaces regularly. If we find burrs, misalignments, or wear beyond 0.02 mm, we polish or resurface them. Mold fit is everything when it comes to controlling flash. - Control Material Loading
Our operators are trained to load a precise amount of rubber based on part volume and expected compression. We also use preforms (pre-measured rubber blanks) in compression molding to minimize overfill risk. - Adjust Molding Pressure Appropriately
In compression molding, we avoid excessive pressure that could force the rubber into vent gaps. For injection molding, we optimize holding pressure—just enough to fill the cavity without overflowing the parting lines. - Use Precision Clamping Systems
Our hydraulic presses are equipped with pressure sensors and level-control systems to ensure uniform clamp force across the mold. This prevents any one side from lifting under pressure. - Design With Flash Traps When Necessary
For certain products, we intentionally add a flash trap—a small groove beyond the parting line to collect excess material without affecting the product itself. This makes post-processing easier and reduces part rejections. - Automated Deflashing Options
If small flash is unavoidable (e.g., in high-speed production), we offer post-processing methods like cryogenic deflashing, tumbling, or manual trimming, depending on part size and tolerance.
Controlling flash isn’t just about aesthetics—it’s a sign of tight process control. Our commitment to maintaining tooling, applying precise pressure, and training operators ensures that Kinsoe’s products arrive clean, functional, and ready to use—without extra work on your end.
6. Brittle Fracture
Brittle fracture, or cracking under low strain, is one of the most serious rubber product failures. Unlike flexible tears, brittle cracks often happen suddenly and without warning—leading to leaks, loss of sealing, or complete product failure. At Kinsoe, we’ve seen brittle fractures arise in applications from automotive engine bays to outdoor gaskets, especially when materials aren’t properly matched to the environment or curing process.
What Causes It
The root causes of brittle behavior in rubber usually include:
- Overcuring or excessive heat – Prolonged vulcanization can make rubber stiff and brittle instead of elastic.
- Material aging – Exposure to oxygen, ozone, UV, or high temperatures degrades the polymer chains, especially in natural rubber, SBR, and NBR.
- Low-impact rubber formulation – Some compounds are inherently more rigid and less capable of absorbing shock or flexing under pressure.
- Filler overload or poor dispersion – High filler content, especially when not well dispersed, leads to internal stress points that fracture under strain.
- Cold-temperature embrittlement – Some rubbers, like NBR or PVC blends, lose flexibility at low temperatures.
Our Proven Solutions
Here’s how we prevent brittle fractures in Kinsoe rubber products:
- Control Vulcanization Time and Temperature
Every rubber compound has a specific curing window. We use rheometers to analyze the cure curve and ensure we’re hitting the optimal “T90” (time to 90% cure) without over-shooting. For example, curing EPDM at 160°C may require 10–12 minutes, but longer times can lead to degradation. - Use Anti-Aging Additives
We formulate each rubber with antioxidant and antiozonant packages tailored to the application. For outdoor parts, we often use waxes or amine-based antiozonants that migrate to the surface and form a protective barrier. - Select Materials With Good Low-Temperature Flexibility
For applications requiring cold resistance, we avoid rigid elastomers and use silicone, EPDM, or fluoroelastomers that maintain elasticity down to -40°C or lower. We also test brittleness temperature as part of our QC checks. - Reduce Filler Load Where Necessary
We keep reinforcing fillers (like carbon black) within recommended limits. Excessive loading might boost hardness, but it also creates stiffness that reduces flexibility and increases fracture risk. We use dispersion aids to ensure even filler distribution. - Stress-Relieving Design Considerations
In parts with sharp corners or thick/thin transitions, stress tends to concentrate. We help clients redesign such areas with radiused corners or consistent wall thickness to reduce crack initiation points. - Conduct Accelerated Aging Tests
For critical parts, we simulate years of exposure using accelerated aging ovens (e.g., 70°C for 7 days = approx. 2 years of aging) to verify material longevity. We also monitor changes in hardness, elongation, and tensile strength over time.
Preventing brittleness isn’t just about materials—it’s about thoughtful formulation, tight curing control, and environmental awareness. If you’re seeing cracked seals or hardened gaskets, we can help diagnose whether it’s overcuring, ozone attack, or material mismatch—and then engineer a better solution.
7. Mold Sticking
Mold sticking occurs when the rubber part adheres to the mold cavity, making demolding difficult or damaging the part during removal. This not only slows down production but also increases the risk of tearing, surface defects, and product waste. At Kinsoe, we treat mold release consistency as a key part of process reliability.
What Causes It
In our troubleshooting work, we’ve identified these primary causes of mold sticking:
- Insufficient or uneven release agent application – Skipped or patchy release coatings leave areas prone to adhesion.
- Improper mold temperature – High temperatures may cause the release agent to burn off prematurely, or increase the tackiness of the compound.
- Poor mold surface finish – Scratches, corrosion, or high roughness can grip the rubber.
- High compound tackiness or filler content – Some rubber types, like soft EPDM or natural rubber, tend to stick more readily—especially with high plasticizer or resin load.
Our Proven Solutions
To avoid mold sticking, we take a multi-faceted approach:
- Use the Right Release Agent for Each Rubber Type
Different rubbers require different release chemistries. We use silicone-based agents for most compounds, water-based for peroxide-cured rubber, and fluoropolymer-based for high-temp or high-tack materials. Matching the agent to the cure system is crucial. - Apply Release Agent Uniformly and Consistently
Our operators are trained to apply release agents as a thin, even mist—either manually or via automatic sprayers. Over-application can lead to buildup and surface defects, while under-application leads to sticking. - Optimize Mold Temperature
If the mold is too hot, the release agent can evaporate before the rubber enters. If too cold, the rubber may not cure fully and remain tacky. We monitor mold temperatures closely using embedded thermocouples and digital PID controllers to stay within a ±3°C window. - Polish and Maintain Mold Surfaces
Smooth, clean mold cavities significantly reduce sticking. We regularly polish our molds and apply anti-corrosion coatings if they’re exposed to humidity or acidic compounds. If surface roughness exceeds 0.8 Ra, we rework the cavity. - Adjust Compound Formulation to Reduce Tack
When persistent sticking is traced to the rubber formula, we modify it with process aids like stearic acid, waxes, or internal lubricants. We may also reduce tack-inducing components like certain oils or resins. - Consider Part Geometry and Demolding Angles
Undercuts, sharp edges, and steep draft angles make demolding harder. We help clients redesign parts for easier ejection, or adjust venting and ejector pin placement to release parts cleanly.
Reducing mold sticking improves production efficiency, prolongs mold life, and protects product quality. Our experience shows that consistent mold prep, clean operating practices, and tailored formulation tweaks can solve even stubborn sticking issues—without relying on excessive release sprays that may affect downstream adhesion or painting.
8. Unclear Mold Imprint
In many rubber products—especially seals, branded parts, or gaskets—fine details like logos, grooves, or sealing lips must be molded sharply and consistently. When those details are blurry or shallow, it’s not just a cosmetic problem; it can lead to performance failures (such as incomplete sealing or incorrect fit). At Kinsoe, we’ve helped clients resolve this issue in everything from precision valve seats to aesthetic covers.
What Causes It
Based on our production experience, the most common causes of unclear or incomplete mold imprints are:
- Poor mold design or wear – Worn-out or shallow engravings in the mold lead to low-detail transfer.
- Inadequate material flow – If the compound doesn’t flow easily into fine cavities, it may fail to fill small features.
- Low molding pressure – Insufficient pressure can prevent full contact between the rubber and the mold surface.
- Premature curing or cold flow – If the rubber starts to set before reaching all details, the imprint won’t fully form.
Our Proven Solutions
Here’s how we ensure crisp and consistent mold detail reproduction:
- Optimize Mold Design and Maintenance
We ensure mold engravings are deep enough and shaped to promote full material contact—usually with draft angles of 2–3° for release. For fine logos or sealing details, we use laser-engraved or EDM-machined cavities. These are checked after every few thousand cycles to ensure they haven’t worn down. - Use High-Flow Rubber Compounds
We formulate compounds for good flow into narrow features, especially for complex gaskets or textured surfaces. This may involve lowering the compound’s viscosity, adjusting the filler content, or using more process oil or plasticizers. - Preheat Compounds and Molds Appropriately
Preheating reduces compound viscosity at the point of molding, allowing it to flow more easily into fine details. For compression molding, we often preheat rubber blanks to 80–100°C before loading. Molds are typically maintained at 150–180°C depending on the rubber type. - Increase Molding Pressure During Fill Stage
We apply sufficient compression force to push the compound into every corner of the mold—especially during the initial “flash” stage. In injection molding, we optimize holding pressure and packing time to ensure full cavity filling. - Vacuum Assist or Venting for Micro-Details
In intricate designs, we use vacuum systems or strategically placed vent grooves to allow air to escape—ensuring the rubber fully contacts the mold without trapping bubbles or voids that obscure detail. - Use of Flow Simulation Software (Optional)
For complex, multi-cavity parts, we sometimes run flow simulations to predict fill behavior and identify areas that need redesign or venting improvements.
Clear mold imprints don’t just reflect quality—they often affect functionality. By treating mold detail with the same importance as dimensional accuracy, we make sure your product performs precisely as designed, down to the smallest ridge or groove.
9. Ozone Cracking
Ozone cracking is a silent killer in the rubber industry. It manifests as fine surface cracks—usually on stretched or exposed areas of rubber products—that progressively deepen and eventually cause failure. At Kinsoe, we’ve seen entire product batches rejected due to premature ozone cracking, especially in outdoor or electrical insulation applications.
What Causes It
Ozone (O₃) in the atmosphere, even at very low concentrations, reacts with the double bonds in unsaturated rubbers. This reaction breaks molecular chains and causes:
- Cracking in tensioned areas – Ozone attacks rubber most aggressively where the material is stretched or flexed.
- Aging in storage – Products stored near electrical equipment (like motors or transformers) often experience accelerated ozone exposure.
- Wrong material choice – Rubbers like natural rubber (NR), styrene-butadiene rubber (SBR), and nitrile rubber (NBR) are especially vulnerable to ozone attack.
- Lack of protective additives – Without antiozonants, exposed surfaces degrade quickly, especially under UV or heat.
Our Proven Solutions
Here’s how we protect our rubber products from ozone damage:
- Use Ozone-Resistant Elastomers Where Needed
For outdoor, high-voltage, or flexing applications, we select materials with built-in ozone resistance. EPDM, butyl rubber, chloroprene (CR), and fluoroelastomers are highly resistant due to their saturated backbones. We guide our clients to these materials for hoses, gaskets, weather seals, and insulation covers. - Incorporate Antiozonants Into Formulations
For ozone-sensitive rubbers like SBR or NBR, we add wax-based antiozonants and amine-type antiozonants. These migrate to the surface and form a protective layer that neutralizes ozone before it penetrates the material. We balance the dosage carefully to avoid bloom (surface whitening). - Design With Protective Geometry
We recommend minimizing sharp bends, tensioned surfaces, or thin lips that can concentrate strain and attract cracking. For example, rounded cross-sections perform better than flat strips in outdoor gaskets. - Protect During Storage and Shipping
We package sensitive rubber components in ozone-safe bags and recommend clients store them away from high-voltage equipment or ozone-generating sources. Storage in a cool, dark, and ventilated space can significantly extend shelf life. - Perform Accelerated Ozone Testing (ASTM D1149)
For products that must withstand ozone exposure, we simulate long-term attack using accelerated aging chambers that expose parts to controlled ozone at 40–60°C under tension. This helps us validate our formulations and make necessary improvements before full-scale production. - Add Surface Coatings for Extra Protection (Optional)
In extreme environments, we offer options like applying protective silicone coatings or EPDM sleeves over vulnerable areas. These act as sacrificial barriers and can delay or prevent ozone degradation.
Ozone cracking often goes unnoticed until it’s too late—when a gasket leaks or a cover splits. That’s why at Kinsoe, we treat ozone resistance as a key design factor, not an afterthought. Whether you’re supplying parts for infrastructure, power systems, or outdoor equipment, selecting the right rubber and additives will pay off in long-term reliability.
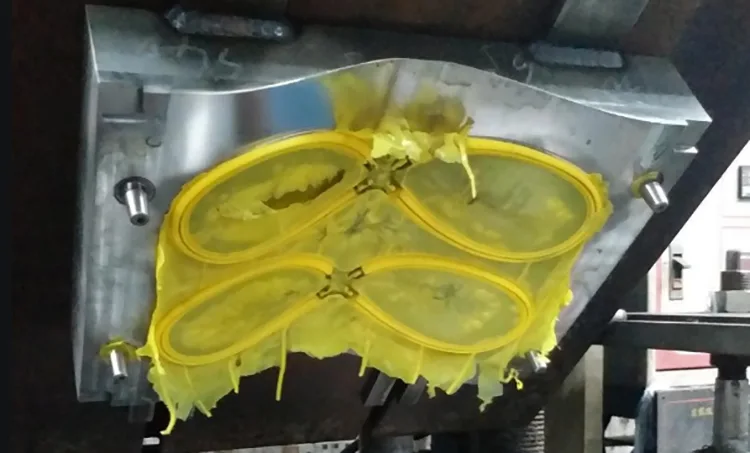
10. Short Shots / Incomplete Fill
Short shots occur when a molded rubber part is not fully formed—leaving voids, missing edges, or incomplete sections. At Kinsoe, we take these defects seriously because they not only ruin part appearance but also compromise critical functions like sealing, fit, or load-bearing performance.
What Causes It
Short shots typically result from one or more of the following:
- Insufficient injection or compression pressure – The rubber compound can’t completely fill the mold cavity, especially in thin or intricate sections.
- Material flow obstruction – Cold slugs, blocked gates, or tight runner channels can prevent proper material flow.
- High compound viscosity – If the rubber is too stiff or not preheated, it may solidify before it fills the entire mold.
- Low mold or material temperature – The rubber may start curing too early or resist flow into all corners.
- Poor mold design – Complex geometry without sufficient venting can trap air and prevent full cavity fill.
Our Proven Solutions
Here’s how we prevent incomplete fill issues in our rubber molding processes:
- Optimize Injection or Compression Pressure Profiles
In injection molding, we fine-tune the initial fill rate and switch to high holding pressure as the cavity nears full. For compression molding, we use a carefully calculated preload followed by a timed ramp-up to full tonnage, ensuring full material flow without flash. - Ensure Proper Material Preheating
We preheat both the rubber blank and the mold to ensure the compound flows easily. For compression molding, a preheat of 80–100°C can significantly reduce viscosity and improve fill. - Redesign Runners and Gates
When dealing with short shots, we often discover the runner channels are too narrow or the gate location is suboptimal. We may increase runner diameter, move gates closer to critical areas, or use multiple gates to improve flow distribution. - Add Venting Grooves or Vacuum Assistance
Air trapped in the mold can block rubber flow and cause partial fills. We include micro-vents at the far ends of each cavity or use vacuum compression molding for high-precision parts to evacuate air before curing begins. - Adjust Compound Flowability
If the rubber is too stiff to fill the cavity, we revise the formula—adding process oils, plasticizers, or flow enhancers. We also adjust filler type and particle size to reduce internal friction during molding. - Use Flow Simulation for Complex Geometries
For complicated parts, we simulate the flow of rubber within the mold using mold flow analysis software. This allows us to predict short shot risk areas and redesign before cutting steel.
Short shots are usually a sign of a mismatch between compound behavior and mold setup. By taking a scientific, data-driven approach to flow analysis, pressure control, and preheating, we help our clients avoid costly rejections and ensure every cavity is filled—every time.
11. Poor Wear Resistance
Rubber products used in dynamic environments—such as conveyor belts, pump diaphragms, gaskets in vibrating systems, or rollers—must withstand continuous abrasion, friction, or contact with rough surfaces. When they wear out too quickly, it leads to downtime, replacement costs, and safety risks. At Kinsoe, we’ve helped many clients resolve premature wear by making informed design and material changes.
What Causes It
Inadequate wear resistance is often caused by:
- Low material hardness – Softer rubbers tend to wear faster, especially under load or friction.
- Lack of reinforcing fillers – Without proper reinforcement (e.g., carbon black or silica), rubber lacks abrasion resistance.
- Wrong compound for the application – Some elastomers naturally have poor wear resistance (e.g., silicone) and are unsuitable for abrasive conditions.
- Surface roughness or misalignment – The mating surface or application environment can accelerate wear.
- Under-curing or poor dispersion – Incomplete vulcanization or uneven mixing can lead to weak spots that wear rapidly.
Our Proven Solutions
Here’s how we significantly improve wear resistance in Kinsoe’s rubber parts:
- Select High-Abrasion-Resistant Elastomers
For wear-critical parts, we use rubbers like nitrile (NBR), natural rubber (NR), or polyurethane (PU)—which offer excellent abrasion resistance. For harsher chemical environments, HNBR or EPDM with fillers may be chosen. - Increase Hardness as Appropriate
While hardness alone doesn’t guarantee durability, increasing it from, say, 50 Shore A to 70–80 Shore A often improves wear performance. We adjust plasticizer and filler ratios to balance toughness with elasticity. - Reinforce With Functional Fillers
We use high-structure carbon black or precipitated silica to toughen the rubber and resist mechanical erosion. These fillers create a strong internal structure and protect the surface from scuffing or particle abrasion. - Optimize Cure System for Crosslink Density
The degree of vulcanization affects how the rubber resists friction and tearing. We fine-tune the sulfur or peroxide cure system to achieve the right crosslink density—not too soft, not overly brittle. - Use Surface Treatments or Coatings (Optional)
For high-speed or contact-intensive applications, we apply anti-wear coatings (e.g., rubber over-molding on fabric, or surface-treated outer layers). In some cases, fabric-reinforced rubber or laminated layers provide dual benefits: flexibility and abrasion resistance. - Design for Contact Stress Reduction
We help clients redesign the rubber’s contact area—adding rounded edges, reducing sharp transitions, or enlarging the load-bearing surface—to minimize concentrated friction points. - Test According to DIN 53516 or ISO 4649
We evaluate wear resistance using standardized abrasion tests (loss in mm³). This allows us to compare formulations and select the most durable compound based on real data, not just assumptions.
Improving wear resistance often involves balancing several variables—compound hardness, filler type, surface friction, and design geometry. At Kinsoe, we guide our clients through these trade-offs to ensure your rubber part doesn’t just look good on day one—it performs consistently over time.
12. Poor Heat Resistance
In high-temperature environments—like engine compartments, industrial ovens, or near exhaust lines—rubber products must maintain flexibility, strength, and sealing performance without cracking, hardening, or deforming. At Kinsoe, we frequently work with clients whose applications require stable rubber performance at 150°C or higher. When heat resistance is overlooked, product lifespan drops sharply.
What Causes It
Poor heat resistance typically results from:
- Using the wrong rubber type – Not all rubbers are designed to handle heat. Materials like NR and SBR degrade quickly above 100°C.
- Incomplete curing – Under-cured rubber softens and breaks down faster when exposed to heat.
- Overuse of plasticizers or low-temp oils – These ingredients can leach out or volatilize at high temperatures, causing shrinkage, hardening, or brittleness.
- Poor antioxidant systems – Without thermal stabilizers, heat exposure accelerates oxidation and degradation.
Our Proven Solutions
Here’s how we ensure excellent heat resistance in Kinsoe’s rubber products:
- Use High-Temperature-Resistant Elastomers
The first and most important step is selecting the right base material. Depending on your temperature requirements, we use:- Silicone Rubber (VMQ) – Withstands up to 200–250°C, ideal for food-grade and electrical insulation applications.
- EPDM – Good for continuous exposure up to 150°C, resistant to steam and weathering.
- FKM (Viton®) – Handles 200–250°C with excellent chemical and thermal stability.
- HNBR – High strength and moderate heat resistance (up to 150°C), great for automotive seals.
- ACM or AEM – Common in automotive oil and heat environments.
- Ensure Proper Curing Conditions
We cure each compound according to its optimal vulcanization profile. Under-curing is a hidden enemy—heat will accelerate post-cure breakdown, leading to cracks or loss of elasticity. We use rheometric data to validate cure cycles for each product batch. - Limit Use of Volatile Additives
We minimize or eliminate plasticizers, processing oils, or waxes that volatilize under heat. If necessary, we substitute with high-boiling-point esters or phenolic resins that maintain stability at elevated temperatures. - Incorporate Heat Stabilizers and Antioxidants
We blend in thermal antioxidants that scavenge free radicals generated by heat exposure. These include amines, phenols, and metal deactivators, which prolong rubber life in hot environments. - Perform Accelerated Heat Aging Tests (ASTM D573)
For critical applications, we expose samples to elevated temperatures (e.g., 150°C for 70 hours) and monitor hardness, tensile strength, and elongation changes. This helps predict long-term heat durability. - Use Heat-Resistant Reinforcement Fabrics (if applicable)
For hoses or fabric-reinforced seals, we select fiberglass, aramid, or polyester fabrics that won’t shrink or degrade under heat—ensuring the entire structure stays stable.
In our experience, heat failure is often preventable. By choosing thermally stable materials and controlling formulation and curing with precision, we deliver rubber products that perform reliably—even under the pressure of heat, time, and continuous use.
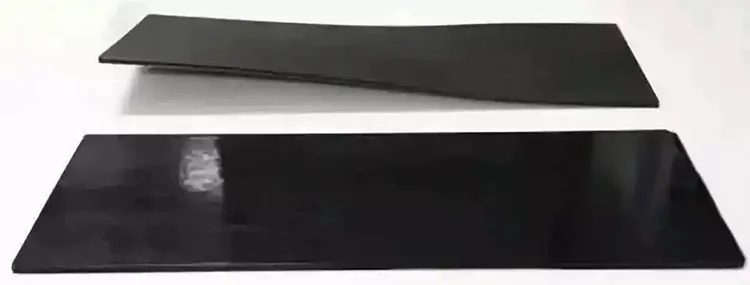
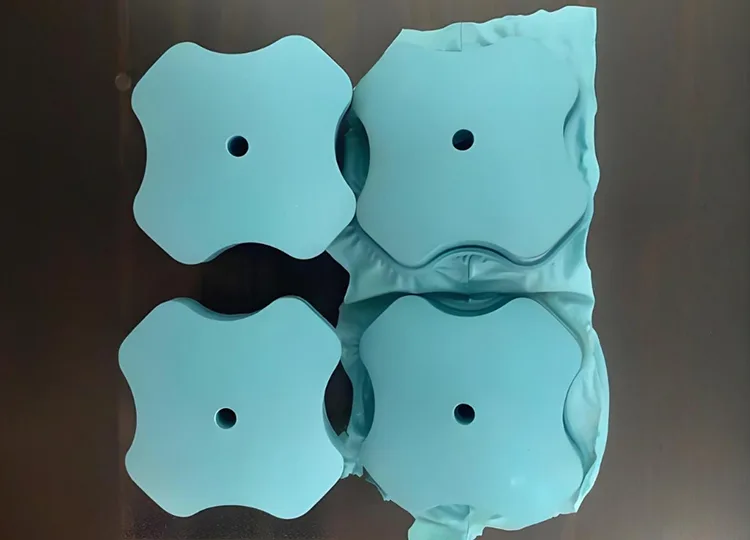
13. Warpage and Deformation
Warping or deformation refers to the rubber part bending, twisting, or curling out of shape—either right after molding or during storage and use. At Kinsoe, we take these defects seriously because they often render the part unusable, especially in sealing or alignment-critical applications like door gaskets, enclosures, or precision sleeves.
What Causes It
Deformation typically stems from a combination of design flaws, material imbalance, and thermal inconsistencies:
- Uneven cooling after molding – Rubber contracts at different rates if cooling isn’t uniform across the mold or part geometry.
- Inconsistent wall thickness – Areas with thick and thin sections shrink differently, causing distortion.
- Premature demolding – Removing parts before they’ve cooled and set properly can lead to shape loss.
- Residual stress – Over-compression or improper curing can lock stress into the material, which releases as warping post-molding.
- Poor storage or stacking – Flexible parts stored under load or pressure can deform over time.
Our Proven Solutions
Here’s how we control and prevent warpage in our production lines:
- Optimize Mold Cooling and Heat Distribution
We use temperature-controlled platens or circulating oil channels to ensure the entire mold cools evenly. This prevents one side of the part from shrinking faster than the other. - Design for Uniform Wall Thickness
We work closely with clients to avoid drastic thickness transitions. When variation is unavoidable, we adjust cure time and packing pressure to balance internal stress across the part. - Allow Controlled Cooling Before Demolding
We don’t rush. Every part remains under pressure in the mold until it reaches a safe temperature for removal. For large or thick parts, this dwell time is critical to prevent rebound deformation. - Post-Cure With Support Fixtures (When Needed)
For long or thin-walled parts prone to curling, we post-cure them in rigid metal or composite frames to “train” the final shape. This ensures the rubber stabilizes in the correct form as it finishes crosslinking. - Use Low-Shrinkage Formulas
We select compounds that exhibit low post-cure shrinkage, especially for precision applications. Adding reinforcing fillers like silica or carbon black helps minimize movement during and after curing. - Proper Storage and Handling Practices
Once molded, parts are stored flat or hung vertically in controlled environments. We avoid stacking flexible parts in a way that could bend them, and we recommend the same to our clients during transport and inventory.
At Kinsoe, we treat deformation control as both a production and design challenge. Whether we’re improving mold temperature balance or working with engineers to redesign part geometry, our goal is simple: deliver a rubber product that holds its shape and function—today, tomorrow, and for years in the field.
14. Insufficient Tensile Strength
Tensile strength defines how much force a rubber part can withstand before it breaks when stretched. It’s critical for seals under tension, diaphragms, boots, and any part subject to pulling or stretching forces. At Kinsoe, we often help clients troubleshoot parts that tear too easily during installation or fail prematurely in the field.
What Causes It
Low tensile strength is commonly caused by:
- Poor material selection – Some elastomers naturally have low tensile strength, and may not be suitable for load-bearing or dynamic applications.
- Under-curing – If the rubber isn’t fully vulcanized, the molecular network is weak and prone to tearing.
- Inadequate filler or reinforcement – Rubbers without proper filler reinforcement lack structural integrity.
- Poor dispersion during mixing – Uneven distribution of curatives, fillers, or plasticizers creates weak spots.
- Degradation from age, heat, or chemical exposure – Over time or under harsh conditions, rubber loses elasticity and becomes brittle.
Our Proven Solutions
Here’s how we ensure rubber parts from Kinsoe meet and exceed tensile strength requirements:
- Choose High-Strength Base Elastomers
We select materials like natural rubber (NR), nitrile (NBR), fluoroelastomers (FKM), or HNBR, depending on the application. For ultra-high tensile applications, NR still offers the best base performance, often exceeding 20 MPa when reinforced correctly. - Reinforce With Functional Fillers
We use high-structure carbon black, precipitated silica, or nano-reinforcements like clay or fiberglass powder to significantly improve tensile and tear resistance. The right filler load and type directly enhance the mechanical strength. - Ensure Optimal Vulcanization
Using rheometers, we fine-tune the cure system (sulfur or peroxide) and determine the precise vulcanization time and temperature. Over-curing can make rubber brittle, while under-curing leaves it weak and soft. We aim for ideal crosslink density to balance strength with flexibility. - Improve Mixing Uniformity
We use precision internal mixers and strict mixing sequences to fully disperse curatives and fillers. Weak zones caused by poor dispersion are a leading cause of inconsistent tensile results in third-party labs. - Perform Regular Tensile Testing (ASTM D412 / ISO 37)
We routinely test samples from each batch to verify tensile strength, elongation, and modulus. This data is logged and used to monitor long-term material performance and spot deviations early. - Avoid Degradation Factors in Storage and Use
We use antioxidants and UV stabilizers in compounds to prolong performance. In customer environments, we advise protecting rubber parts from oil, UV, ozone, and excessive heat—which can all degrade tensile strength over time.
Tensile strength is a foundational property that determines whether a rubber product will last—or fail—under stress. By carefully controlling materials, formulation, and processing, we at Kinsoe deliver rubber solutions that hold up under pressure—literally.
Conclusion
At Kinsoe, we believe that rubber product quality isn’t just defined by how a part looks fresh out of the mold—but by how it performs in the real world. Every defect—whether it’s a small surface blemish or a critical failure like cracking or deformation—tells a story about the process behind the product. That’s why identifying and solving these issues is not just a technical task; it’s part of our commitment to long-term reliability and customer satisfaction.
Throughout this article, I’ve shared the most common rubber product defects we’ve encountered over the years—along with the proven strategies we use to overcome them. From optimizing compound formulation and mold design to improving curing control and testing, every step in the manufacturing process plays a role in preventing defects.
But beyond technical solutions, quality requires mindset: attention to detail, continuous improvement, and a proactive approach to design and material selection. Whether you’re a buyer sourcing seals for a water system or an engineer developing high-performance gaskets, knowing how to identify and address these issues can make all the difference in cost, performance, and product longevity.
If you’re facing persistent quality issues or want to elevate your rubber component performance, feel free to reach out to our team at Kinsoe. We’re always ready to help you engineer a better solution—backed by experience, testing, and precision.