
I. Technical Background and Industry Overview
When I first entered the rubber component industry, I was surprised by how often customers overlooked one crucial detail—how the seal ring was joined. Most people pay attention to material and hardness, but very few ask how the ends are connected. Yet this seemingly small detail can decide the performance, cost, and lifespan of the entire sealing system.
1.1 Overview of Rubber Extrusion Molding
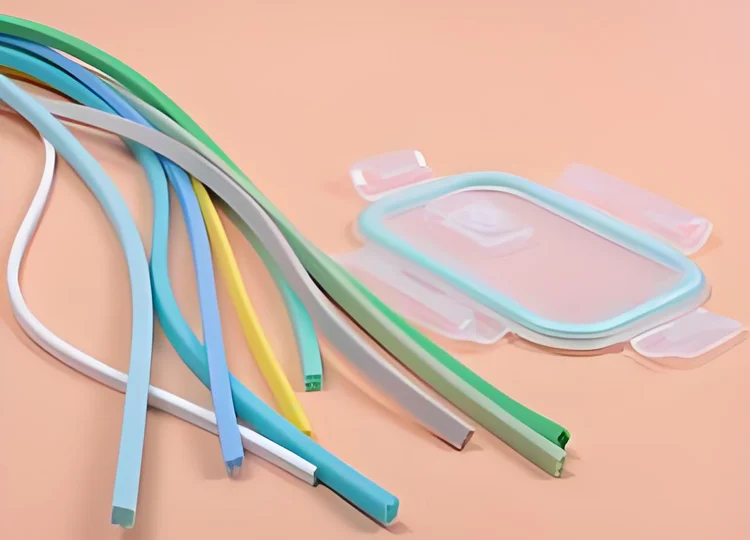
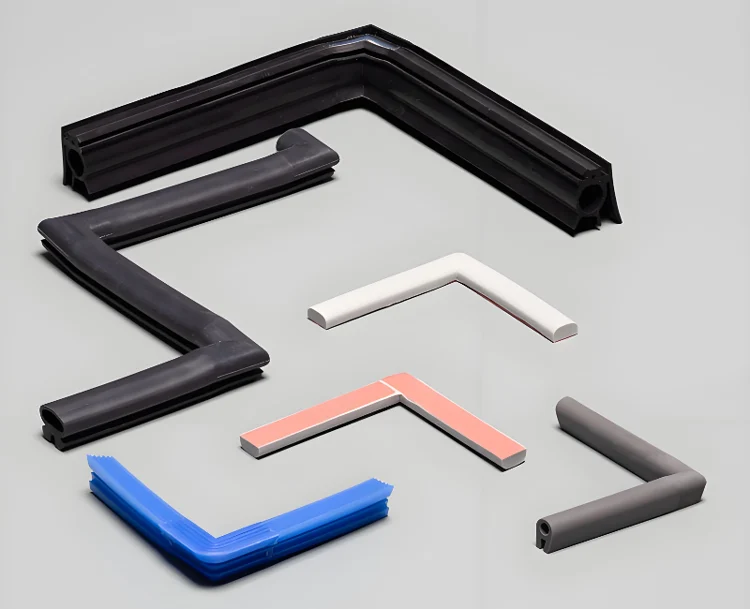
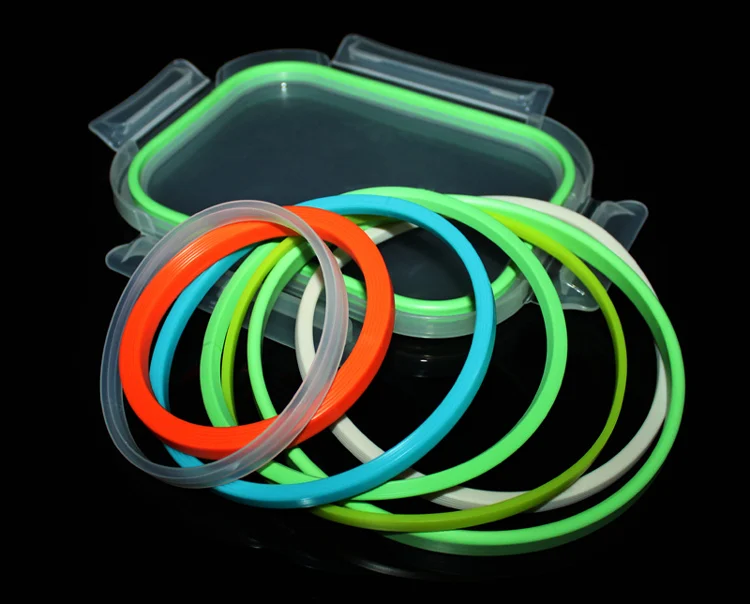
Rubber seal rings are typically produced through extrusion molding, a process that pushes uncured rubber through a die to form continuous cross-sectional profiles. Once extruded, these profiles are either formed into complete rings through joint splicing or molded as a closed loop.
Common cross-section shapes include:
- Round cords
- D-shaped profiles
- Tubes and hollow seals
- Complex asymmetric sections for automotive or appliance use
Each shape brings specific challenges to splicing—especially when dealing with hollow or multi-chamber structures. And here’s the kicker: extrusion is only half the process. Without proper jointing techniques, even the best profile can’t seal properly.
1.2 The Role of Splicing in the Seal Ring Supply Chain
From a manufacturing perspective, splicing enables several key benefits:
- Cost-effectiveness: Instead of creating closed rings through injection molding, which requires expensive molds, splicing offers a faster, more economical alternative—especially for small batches or custom dimensions.
- Customization: Splicing supports non-standard geometries, allowing you to meet complex sealing shapes and design needs without redesigning the whole tooling system.
- Performance tuning: In many cases, joint integrity has a measurable impact on sealing life and mechanical stress. Poor splicing can be the weakest link in an otherwise perfect seal.
That’s why, for industries like automotive, food processing, and medical equipment, the quality of the splice is just as important as the material selection.
1.3 Standards and Quality References
To ensure product reliability and compliance, professional manufacturers like KINSOE follow global industry standards, including:
- ASTM D2000 – A general classification system for rubber materials based on performance criteria.
- GB/T 3452.1 – China’s national standard for O-ring design dimensions.
- ISO 3302-1 – International standard for geometrical tolerances of rubber parts, often referenced for molded and spliced accuracy.
These references act as a framework to evaluate dimensional stability, joint strength, and visual appearance. At KINSOE, we implement tolerance control as tight as ±0.05 mm and conduct performance testing to meet demanding customer applications.
II. Mainstream Splicing Methods and Detailed Processes
In my experience working with custom rubber seal rings, I’ve found that the choice of splicing method often determines not only the strength of the joint but also how fast we can deliver and at what cost. Below is a comparison chart summarizing the three most widely used splicing techniques:
| Splicing Method | Suitable Materials | Joint Strength | Process Difficulty | Production Speed | Cost Level |
|---|---|---|---|---|---|
| Hot Splicing | Solid Silicone, EPDM | High | Moderate | Fast | Medium |
| Cold Bonding | Foam Silicone, EPDM, NBR | Medium | Easy | Medium | Low |
| Mold Vulcanization | All Types | Very High | High | Slow | High |
Let’s explore each method in detail:
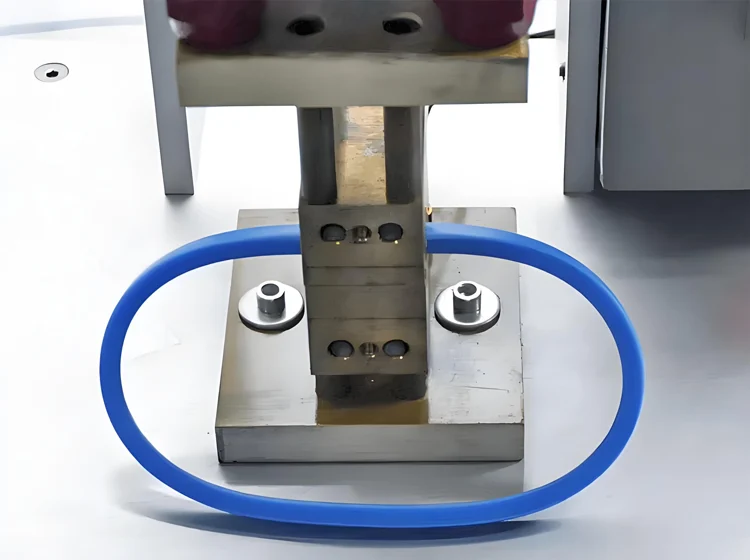
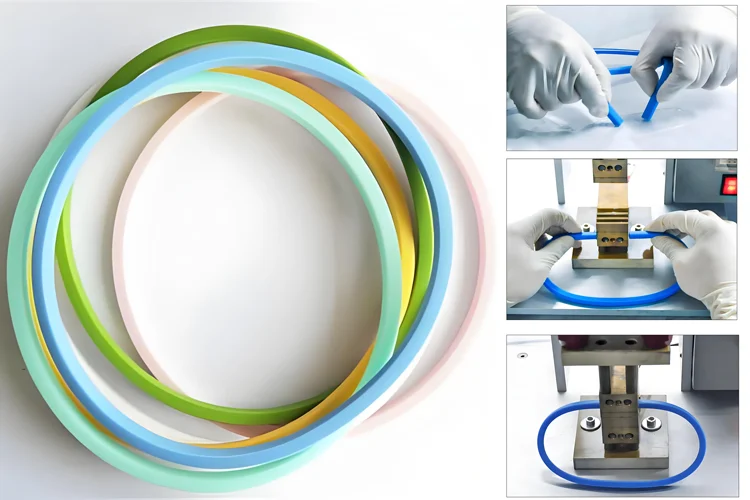
2.1 Hot Splicing
Hot splicing is the go-to method when strength and consistency matter. I often recommend this for applications in automotive, food-grade products, and high-temperature environments.
Process Flow:
- Cutting – Precise angle or butt cutting of the extrusion ends
- Adhesive Application – Heat-activated bonding agent applied to contact faces
- Alignment – Manual or jig-assisted alignment
- Hot Press Molding – Application of pressure and heat (commonly 150–180°C)
- Post-Curing – Secondary heating to improve bond durability
Key Parameters Table:
| Parameter | Recommended Range |
|---|---|
| Temperature | 150–180°C |
| Pressure | 2–5 MPa |
| Time | 30–120 seconds |
Common Defects & Causes:
- Air Bubbles – Incomplete degassing or poor surface prep
- Brittle Joint – Overheating or uneven adhesive distribution
- Cracking – Improper curing or incompatible adhesive
Best Use Cases:
- Lunch box seals
- High-temperature industrial gaskets
- Complex profiles requiring shape retention
2.2 Cold Bonding
Cold bonding is ideal for low-load applications or non-critical sealing, especially in soft materials like foam silicone or EPDM.
Typical Workflow:
- Cutting – Clean and accurate slicing of profile ends
- Surface Preparation – Light sanding, degreasing with alcohol or acetone
- Glue Application – Thin, even layer of cold-setting adhesive
- Clamping or Fixation – Moderate pressure for at least 10–30 minutes
- Natural Curing – Full bond strength after 24–48 hours
Material Suitability:
- Foam Silicone – High absorption, needs surface prep
- Dense Rubber (EPDM, CR) – Moderate performance
- NBR – Good bondability with solvent-based glues
Environmental Requirements:
- Humidity: ≤60%
- Dust-free working surface
- Surface energy >38 mN/m for optimal adhesion
Glue Options:
- Cyanoacrylate (instant) – Fast cure, brittle joint
- Two-part polyurethane – Stronger, flexible bond
Bond Strength Curve Example:
A 2-part PU glue on EPDM reaches 80% tensile strength in 24 hours under 25°C and 50% RH.
2.3 Mold Vulcanization
This is the most advanced and precise method, usually applied to complex joint structures or high-precision batch production.
Principle:
The joint area is placed inside a metal mold where it undergoes a second vulcanization. The heat and pressure fuse the material, making the joint nearly indistinguishable from the original extrusion.
Mold Design Essentials:
- Parting Line Planning – Avoids weak zones in critical sealing paths
- Air Vents – Prevent trapped gases from compromising bond
- Compression Control – Ensures flash-free finish
Optimal Process Window:
| Step | Range |
|---|---|
| Vulcanization Temp | 160–200°C |
| Holding Time | 3–10 minutes |
| Clamp Pressure | 3–6 MPa |
Use Scenarios:
- Medical-grade rings
- Aerodynamic profiles in automotive
- Precision sealing systems requiring 100% visual conformity
III. Key Factors Affecting Splicing Quality
From what I’ve seen in rubber fabrication workshops, two products made with the same material and splicing method can still end up with drastically different performance. Why? Because the details in glue selection, cut angle, and surface treatment make or break the joint. Let’s explore the essential variables.
3.1 Adhesive Selection and Compatibility Matrix
Not all adhesives are created equal—and not all rubbers respond the same way to bonding agents. Here’s how I classify them based on structure and curing behavior:

chloroprene rubber glue
Types of Adhesives:
- Solvent-based (e.g., chloroprene rubber glue): Quick tack, good for EPDM and CR
- Two-component systems (e.g., polyurethane or silicone): Excellent bonding for silicone, flexible and strong
- Cyanoacrylate (instant): Very fast cure, but brittle under vibration or thermal cycling
Material Compatibility Table:
| Rubber Type | Solvent-Based | 2-Part PU | Instant Glue |
|---|---|---|---|
| Silicone | ✖ Low Bond | ✔ Excellent | ✔ Moderate |
| EPDM | ✔ Good | ✔ Good | ✔ Good |
| NBR | ✔ Excellent | ✔ Good | ✔ Good |
| CR (Neoprene) | ✔ Excellent | ✔ Good | ✔ Good |
Recommended Brands:
- LOCTITE 401/406 – For general instant bonding
- Permabond PT326 – For silicone and EPDM
- 3M 847/1300L – For CR and NBR sealing
“Adhesive is not just glue—it’s a compatibility contract between chemistry and application.”
3.2 Cut Joint Design and Optimization
A clean, well-angled cut makes bonding easier and improves tensile performance.
Cutting Style Comparison:
| Cut Type | Description | Performance |
|---|---|---|
| 90° Butt Cut | Straight vertical cut | Moderate |
| Bevel Cut | Diagonal cut at 30–45° | Higher |
| Step Joint | Interlocking step pattern | Highest |
Tensile Strength Test Results:
A controlled test on EPDM strips showed:
- Butt Cut Joint: 1.8 MPa average break force
- Bevel Cut: 2.3 MPa
- Step Joint: 2.8 MPa
If the part will undergo axial tension or torsion, I strongly advise avoiding 90° cuts.
3.3 Surface Treatment and Its Effect on Bond Strength
This is one area where most failure happens silently. You can’t see poor surface energy—but your joint will show the results soon enough.
Treatment Options:
- Plasma Treatment – Ideal for silicone, raises surface energy dramatically
- Chemical Activation (e.g., Primer 770) – Common for EPDM and NBR
- Flame Treatment – Quick method for boosting surface tension on thermoplastics
Performance Boost Table:
| Treatment Type | Surface Energy Gain | Bond Strength Increase |
|---|---|---|
| None | ~32 mN/m | Baseline |
| Plasma Treated | >52 mN/m | +60–80% |
| Primer Applied | ~46 mN/m | +40–60% |
Even on inexpensive foam seals, I’ve seen significant gains just by using a plasma wand or primer coating.
IV. Typical Application Case Studies
Each splicing method we’ve discussed comes with trade-offs—but theory only gets you so far. Let me walk you through three real-world application cases where joint quality was mission-critical, and show you how we tailored the process for optimal performance.
4.1 Food-Grade Seal Rings (e.g., Lunch Box Seals)
Scenario:
A global kitchenware brand approached us to develop FDA-compliant silicone seal rings for their new series of lunch boxes. The product required a seamless, flexible loop that could withstand repetitive washing, temperature cycling, and direct food contact.
Solution Highlights:
- Splicing Method: Hot splicing with FDA-grade adhesive
- Material: Platinum-cured silicone, Shore A 50
- Special Requirements:
- Must pass FDA CFR 177.2600 and EU EN1935 food contact compliance
- High transparency for aesthetic appeal
- Airtight joint with no visible seam
Workflow Card
Extrusion → Precision Cutting → Heat-Activated Adhesive → Thermal Pressing → Secondary Curing → QC Inspection → FDA Migration Tes
This approach yielded a smooth, invisible seam with >2.5 MPa joint strength, compliant with food-grade hygiene and mechanical standards.

4.2 Automotive Door Seal Jointing
Scenario:
An automotive OEM needed a reliable solution to splice complex EPDM hollow profiles for door perimeter sealing. Their pain points included joint leakage during water spray tests and inconsistent bonding under outdoor temperature shifts.
Process Optimization:
- Splicing Method: Hot splicing
- Add-ons:
- Jig fixture to ensure precise alignment of internal chambers
- Controlled humidity environment to eliminate surface condensation
- Automated heat press with temperature sensors and compression feedback
Results:
- Achieved joint tensile strength >2.0 MPa
- 100% pass rate in 96-hour thermal cycling and water submersion test
- Reduced rework rate from 12% to 1.8%
This became our standard offering for similar EPDM sealing programs across multiple vehicle platforms.
4.3 Medical Device Seals (Cleanroom-Grade)
Scenario:
A European medical device manufacturer needed sterile, biocompatible seal rings for a diagnostic fluid system. They required absolutely no contamination risk, and the joint area had to endure both chemical exposure and repeated sterilization cycles.
Solution Engineering:
- Splicing Method: Mold vulcanization with post-cleanroom washing
- Material: Liquid silicone rubber (LSR), USP Class VI certified
- Process Control:
- Mold designed with flush flash control and air channels
- Sterile packaging within ISO Class 7 cleanroom
- Validation of biocompatibility and aging resistance
Performance Metrics:
- Passed 100 autoclave cycles with no degradation
- Seam showed no discoloration, cracking, or swelling
- Achieved zero particle count above 5 µm in critical use zones
This project underscored how high-precision mold vulcanization, though costlier, is unmatched in ultra-clean medical applications.
V. Technical Validation and Quality Assurance System
To guarantee long-term performance, the integrity of a rubber seal ring splice must be more than just visually acceptable. At KINSOE, we enforce a multi-layered validation system based on international test methods, statistical thresholds, and root cause diagnostics. Here’s how we make sure every joint holds up under real-world stress.
5.1 Common Performance Test Methods and Standards
We conduct a full suite of tests to validate mechanical and environmental performance:
| Test Type | Standard | Purpose |
|---|---|---|
| Tensile Strength | ASTM D412 | Measures bond strength and elasticity |
| Sealing Integrity | Custom (air/water/vacuum) | Detects leaks and confirms airtightness |
| Aging Resistance | ASTM D573 / ISO 188 | Simulates long-term performance under heat |
| UV Exposure | ASTM G154 | Evaluates outdoor durability |
| Salt Spray | ASTM B117 | Validates corrosion resistance of bonded area (for EPDM/CR parts) |
Example:
For a silicone gasket splice, a minimum tensile strength of 2.2 MPa is required post-aging at 150°C for 72 hours.
5.2 Benchmarking and Reporting
We routinely compare our in-house performance with industry benchmarks and provide standardized testing reports to clients for traceability.
Key Performance Indicators by Splicing Method:
| Method | Min Tensile Strength (MPa) | Seal Leak Rate (kPa/min) | Max Aging Degradation (%) |
|---|---|---|---|
| Hot Splicing | ≥2.0 | ≤0.5 | ≤15% |
| Cold Bonding | ≥1.5 | ≤1.0 | ≤25% |
| Mold Vulcanization | ≥2.5 | ≤0.2 | ≤10% |
Report Template Includes:
- Product photo with seam marked
- Raw data charts and tensile graphs
- Environmental test logs
- Failure mode analysis if applicable
Clients in the automotive and medical sectors often integrate our reports into their PPAP or ISO 13485 documentation systems.
5.3 Troubleshooting Common Splicing Issues
Even with trained technicians and calibrated machines, things can go wrong. We’ve built a diagnostic framework that helps customers identify and resolve joint failures quickly.
Issue Diagnosis Table:
| Problem | Likely Cause | Recommended Fix |
|---|---|---|
| Weak Bond | Wrong adhesive or low pressure | Review glue type and process settings |
| Bubbles in Joint | Poor air evacuation or surface oil | Improve surface prep and degassing |
| Joint Cracking | Over-curing or mismatched material | Adjust temp/time or check compatibility |
| Misalignment | Jig error or manual deviation | Use fixture guide or laser alignment |
| Seal Leakage | Incomplete contact area or shrinkage | Reevaluate compression rate and tolerance stack |
“Most joint failures aren’t due to one mistake—but a chain of small oversights. That’s why a systemized QA process is essential.”
VI. Conclusion and Next-Step Recommendations
When I first started working on rubber sealing projects, I underestimated how much a single splice could affect a product’s lifetime performance. But after years of collaborating with OEMs, designers, and production engineers, I’ve come to believe that splicing is the silent guarantor of reliability—and often, the differentiator between an average and an exceptional product.
Rubber seal ring splicing may not account for the largest cost component, but it often defines the upper limit of sealing stability, product appearance, and mechanical durability.
This guide was created to give you a deep, actionable understanding of:
- The three main splicing technologies and their process parameters
- Key quality control levers like adhesive choice, surface prep, and cutting geometry
- Application-specific insights drawn from real industrial cases
- Reliable testing, validation, and diagnostic tools for QA implementation
If you are:
- Developing a custom seal ring for specialized machinery or equipment
- Looking to improve current joint durability or reduce failure rates
- Planning to establish or upgrade your internal splicing SOP
…then I invite you to reach out.
At KINSOE, we offer end-to-end technical services—from extrusion design and joint engineering to sample prototyping, batch production, and post-delivery support.
Let us help you build better seals, one perfect splice at a time.
References: